VATCAN Slots Plugin Controller Guide
What is VATCAN?
The VATCAN Slots Plugin is a tool used to display
Installation and Setup
Download and Installation
The VATCAN Slots Plugin is included with the  UK Controller Pack. Alternately, you can find it here.
If you have downloaded it manually, place the file named
UK Controller Pack. Alternately, you can find it here.
If you have downloaded it manually, place the file named VATCANBookings.dll into the EuroScope installation folder, at the path %AppData%\Roaming\EuroScope\UK\Data\Plugin.
Setup
First, the plugin needs to be loaded. Open EuroScope, and open the plugins dialogue box under Other Set -> Plug-ins. Click the "Load" button, select the VATCANBookings.dll file (found in %AppData%\Roaming\EuroScope\UK\Data\Plugin ), and click "Open".
Now that the VATCAN plugin has been loaded, it appears in the main part of the plugin dialogue. Now, we need to allow it to draw on our display.
Select VATCAN by clicking on its line in the plugin dialogue box. Select 'Standard ES radar screen' in the 'Forbidden to draw on types' list, then click the double left angled brackets (<<), which moves 'Standard ES radar screen' into the 'Allowed to draw on types' list. Repeat for 'SMR radar display'.
Following this, we need to edit our departure list to include VATCAN columns.
To do this, click the 'S' in the top left of your departure list to open the Departure List Column settings dialogue.

Click 'Add Item'. This should add a new item called 'Callsign' to the bottom of the list. Select this, and using the drop-down change the tag properties to one of the following options:
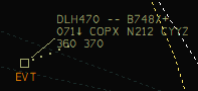
EVT Coloumn
The EVT coloumn will display an 'X' to indicate that an aircraft has a booking.
The recommended properties for this coloumn are as follows:

CTOT Coloumn
The CTOT coloumn will display the Calculated Takeoff Time (CTOT) - a.k.a the slot time - for aircraft with a booking.
The recommended properties for this coloumn are as follows:

Either or both coloumns can be used at once depending on controller preference.
You have now set up VATCAN. Click 'OK' to close the dialog and save your changes. If you don't see the new column, you may need to click the 'F' in the top left and enable your new 'EVT' and/or 'CTOT' columns.
Use of VATCAN
Activating the plugin
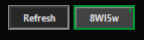
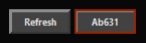
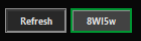
Enter the Event ID provided by the FIR by entering it into the VATCAN UI:

The code can be copied-pasted into the entry field or typed in manually. After typing the code, click anywhere else on the screen, or hit Enter to save the Event ID. Left-click the Refresh Button to validate the Event ID.
Event ID Status Colours
The border of the Event ID Button indicates the status of the data update.
Red - Error
This indicates an error, a message will be sent by the plugin to EuroScope chat to give details of the error.
Amber - Refreshing
The plugin is refreshing and is comparing the CIDs of the aircraft in your departure list to the event bookings list.

Green - Last Refresh Succesful
The plugin has succesfully refreshed all aircraft in your departure list and the slots and CTOTs shown on your screen are up to date.
Auto Refresh
Auto Refresh is activated by right clicking the Refresh Button. When enabled, CIDs will be compared against the event list every five minutes. A manual refresh can be triggered at any time by left clicking the Refresh Button, even when Auto Refresh is turned on.
Radar Target Label Positioning
The position of the radar target label can be toggled by right clicking on the Event ID Button. The label can be displayed at the 3, 6, 9, or 12 o’clock position, or hidden.
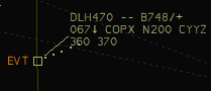
A small square will appear at the top of the Event ID Button when the radar target label is hidden.